Instagram by clicking the icon on the
right bottom side of the app's interface.
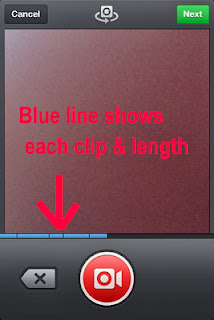
As soon as you click the video camera
icon, it will grow bigger, move to the
center at the bottom of your screen and
turn red. (See the large red camera
button in the image above. ) When that
big red button appears, you're ready to
shoot video. That is the button you will
touch to start recording.
Position Yourself, Frame Your Shot
First, position your camera so the action
you want to record is directly in front of
the camera. Quick tip Try to hold your
hands AS STILL AS POSSIBLE; camera
motion can spoil the quality of a video
even more than it can with still photos.
It's always good to rest the bottom of
the camera on a table or to stabilize
your hands by holding them against
your chest or leaning the camera up
against a tree or wall.
To start recording, just press the red
camera button and hold your finger
down for as long as you want to record
that scene. When you're done, lift your
finger off the screen to stop recording.
The camera will go into "pause" mode.
Remember, you must shoot a total of at
least three seconds and no more than
15 seconds.
Sequences and Camera Angles
Whenever you lift your finger off the
record button, the camera is paused.
This touch-and-hold feature allows you
to shoot different views and
automatically splice them together,
without you having to do tedious
manual editing in order to stitch them
into a continuous video or mini-movie.
All you have to do is lift your finger,
reposition, then press it again to record
your next scene. Instagram will merge
those different shots into a single mini-
movie. (It's the same idea as the Vine 6-
second video app, only the movie can
be longer.)
Inbetween shots, you can (and most of
the time, probably should) reposition
your camera in order to shoot your
subject from a different camera angle.
Quick tip: It's good to stand up close
for one shot and farther away for
another; that way you'll get at least one
super close-up and at least one very
wide shot of the entire scene. Together
with a medium distance shot, a closeup
and wide shot will help your viewer get
a visual sense of the scene you're
filming.
It's also good to hold each shot for three
seconds or more. holding each shot for
three seconds would mean you can
shoot only five scenes. Three or four
different shots is probably the most
you'll want to shoot in a typical short
video.
The Blue Timeline Interface
Regardless of how many clips you
choose to shoot for your Instagram
movie, the recording interface shows a
thin blue line moving across the bottom
of the screen, right below the
viewfinder. The blue line extends
further to the right as record; its length
shows how far along in the 15 allowable
seconds you are. When the blue line
extends all the way to the right, it
means you've used up your maximum
15 seconds.
NEXT: Editing Your Instagram
Videos
Visit daillybook 4more
No comments :
Post a Comment